Sunday, March 29, 2009

Welcome Holden!

DSC00442
Another one of our friends just had her 2nd baby, so I made them this cake when we went for a visit. It is a French Vanilla cake with Fresh Strawberries and whipped cream filling. I just used a box cake mix since it was a last minute thing. I didn't take any pictures on the process of making it. I am sorry. I am even more disappointed at myself for not taking a picture when they cut a slice of it, it was really pretty. 3 layers of strawberries and cream on vanilla cake. MMMMM. As for the filling- really easy. Cut up fresh strawberries and Cool Whip is all you need.

I did however, take a picture of some of the side detail of the cake.


DSC00441
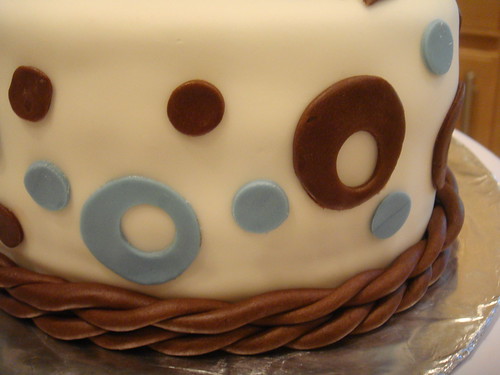
I covered the cake in Wilton white fondant (not the best tasting fondant)- although you could add some flavoring or clear extract to get some good flavor on it, such as lemon, orange, chocolate+peppermint, etc...

I made some chocolate modeling clay to make the brown circles. It basically is a chocolate morsels/wafer+cornsyrup mixture. I used Wilton's because I already had some. In a pinch, I have even used Ghirardelli morsels that I use for cookies. I hear Merckens is pretty good, but I have yet to try them. It pretty much is the flavor and texture of a Tootsie Roll. I think I might try using that next time instead. I did the letters freehand with the modeling clay as well. My first time to try that so it isn't all that great.

Since it was a last minute idea cake, I opted to do retro circles and a rope border. I made the circles by using different sized circle fondant cutters. As for the rope, I just rolled out 2 long pieces and twisted them together. For the blue circles, it's white fondant with some mixed in Wilton Gel Colors that you can find at your local craft store. I got mine at Michaels.

Chocolate Modeling Clay Recipe

10 oz. chocolate chips (or colored candy disks to create different colors)

1/3 cup light corn syrup

Heat chocolate carefully until melted, stir in corn syrup and blend. Pour onto a waxed paper sheet and spread to approx. ½ thick. Cover loosely and let stiffen for a couple of hours or overnight. Chocolate will become very pliable.

Tuesday, March 17, 2009

This thing weighs a ton!

DSC00446Once again, Bakerella has inspired me to make this monster of a cake. FOURTEEN LAYERS!!! She has step by step instructions on how to make it. I followed it to a T (well, at least I think I did). I wanted to make it for the sake of making it- and I was going to visit a friend/coworker who just had a baby, so I had something to give=) I know what your thinking. Sabotage! Yes and no. Usually when I make these cakes I give them to friends or let my husband take it to work. I can't leave it laying around in the house- or I would weigh a ton. I'm about 2 lbs and 2 fork fulls of cake from it.

What can I say, I love to bake and make people's mouths happy!

Check out the inside:


DSC00448

Here is the recipe that was used-it's really actually from Oprah's website. A southern cake from her former chef Art Smith. This recipe is for 12 Layers.

Ingredients:Makes 16–20 servings

4 1/2 cups all-purpose flour , sifted
1 1/2 teaspoons baking powder
1/4 teaspoon salt
1 1/2 cups (3 sticks) unsalted butter , at room temperature
2 1/2 cups sugar
6 large eggs , at room temperature
3 cups milk
1 1/2 teaspoons vanilla extract
3 cups sugar
1/2 cup unsweetened cocoa powder , preferably Dutch process
1 cup (2 sticks) unsalted butter , cut up
1 can (12 ounces) evaporated milk
1 tablespoon vanilla extract
Pecan halves, for garnish

Position racks in the center and bottom third of the oven and preheat to 375°. Lightly butter four 8 1/2- to 9-inch cake pans (you will bake the cakes in three batches) and line the bottoms with rounds of parchment paper. Flour the pans and tap out the excess.

To make the layers, sift together the sifted flour, baking powder and salt. Sift the mixture one more time, and set aside.

Beat the butter and sugar in the bowl of a heavy-duty electric mixer fitted with the paddle blade on high speed until light in color and texture, about 3 minutes. Beat in the eggs, one at a time. Scrape down the bowl and be sure the mixture is well-blended. On low speed, add the flour in 3 additions, alternating with 2 additions of the milk, beginning and ending with the flour, and beat until smooth, scraping down the sides of the bowl often with a rubber spatula. Beat in the vanilla. Using a scant cup for each layer, spread the batter evenly in the pans. It will make a thin layer.

Staggering the pans on the racks so they are at least 2 inches from each other and the sides of the oven and not directly over each other, bake the layers until they feel firm when pressed in the centers and are beginning to pull away from the sides of the pans, about 12 minutes. Cool in the pans for 5 minutes. Invert the layers onto cake racks, remove the parchment paper, and cool completely. Wash and prepare the pans. Repeat the procedure until all 12 layers have been baked and cooled.

To make the icing, bring the sugar, cocoa, butter and evaporated milk to a full boil in a large saucepan. Reduce the heat to medium-low and cook until the icing has thickened slightly (it will resemble chocolate syrup but will thicken as it cools), about 3 minutes. Stir in the vanilla. Let the icing cool until thick enough to spread, but still pourable.

Place a layer of cake on a wire rack set over a jelly-roll pan. Spread with a few tablespoons of the icing, letting the excess run down the sides. Stack the remaining cakes, icing each layer. Pour the remaining icing over the top of the cake. If you wish, smooth the icing on the edges to cover the sides. Place pecan halves around the top perimeter of the cake. Let stand until the glaze sets. (The cake is best served the day it is made. To store, cover loosely with plastic wrap and refrigerate for up to 1 day.)

Recommended technique: If you buy inexpensive aluminum foil cake pans at the grocery store (they can be saved for another time as well), you will be able to knock out layers in no time. And no washing between baking!

Tuesday, March 10, 2009

Taking a break from baking.

DSC00393
I have been meaning to go down to hello, cupcake in Tacoma for awhile. We only live about 30 minutes away. It is conveniently located to The Tacoma Art Musuem, The Museum of Glass, Union Station, and the Washington State History Museum. On a Wednesday, I decided it was the perfect time to take my daughter to all 3 museums and the cupcake shop. I only did the 3 museum thing because there was a special price for all 3 places.

Anyway, hello, cupcake is such a cute place! I believe I bought one of each flavor of cupcake. It was good, but not Sprinkles good. I do love Sprinkles cupcakes, but it has to be fresh. The best flavors in my opinion are the Red Velvet, Dark Chocolate, Lemon, and Carrot. I see on their website there are a few new flavors I would like to try, unfortunately I don't know when i'll have that chance to try them out. I am hoping they open up a location in Seattle, but there are 2 competing cupcake shops there.

Here are the cupcakes from hello, cupcake:


DSC00399
Before....

DSC00400
and after...I tasted half of each cupcake. The other half was for my husband.

I can't remember all the flavors, so check it out on their website.
Blog Widget by LinkWithin